Friday, September 21, 2012

best ever vegan ginger molasses cookies.


Sometimes I want to feel like home. Sometimes I need a hug from my mom. 

Cookies are like hugs, especially when that hug is coming from my own mother. My deep-rooted love affair with cookies stems from her. (PLANT PUNS.) We're simple people when it comes to desserts; my mother is a strong believer in the medicinal properties of a fresh-baked cookie.

Let's talk about molasses cookies. They're my all-time favorite and one of my mom's favorites. I cannot, will not ever turn one down. Cozy and autumn-y and gingery and chewy. YOU, my friend, are a star among cookies. 


The ultimate cookie hug from your mom.

Vegan Ginger Molasses Cookies

Ingredients:

2 1/4 cups all purpose flour
2 tsp baking soda
1/4 tsp salt
1 1/2 tsp cinnamon
1 tsp ground ginger
1/2 tsp cloves
3/4 cup non-dairy, non-hydrogenated buttery spread
1 flax egg (1 Tbs ground flax mixed with 3 Tbs warm water) or 1 alternative egg subsitute
1 cup light brown sugar
1/4 cup molasses
white sugar, for rolling

In a medium-sized bowl, whisk together flour, baking soda, and salt. In a large bowl, beat together butter, brown sugar, and spices for two minutes. Beat in flax egg and molasses. Gradually add dry ingredients and combine til incorporated. 

Refrigerate dough for at least 30 minutes

Preheat oven to 350 degrees.

Roll dough into walnut sized balls. Before placing on cookie sheet, roll in white sugar. Bake cookies for 10-12 minutes and let rest on cookie sheets before placing onto a wire rack for cooling.


HEY! This articles is on One Green Planet! Cool beans!

Tuesday, September 18, 2012

you should wear a midi ring.


When I stepped outside this morning, I knew it was going to be a lovely day.

  1. I had no issues finding a place to park my bike.
  2. I got to wear a fall-time scarf.
  3. It's Free Coffee Tuesday at the Holiday gas station again.
  4. Someone was wearing very bright, purple tights.
  5.  I had a haircut scheduled.
  6.  Last night my friends and I finally won trivia at Buffalo Wild Wings. We were gifted twenty dollars each and an extra veggie boat. Perfection.

All of these things instilled in me a need to craft like you wouldn't believe. Obviously.

I don't know if you know about midi rings. You wear them above your knuckle, they're super bomb, and I'm about to share with you the actual easiest tutorial so you can make your own. It has only two steps. LET ME SEE YOU ONE-TWO STEP.

Two Step DIY Midi Ring

You'll need: An eye pin, a small bead, a thin marker to shape your ring around, and needle nose pliers.


1. Wrap your eye pin around the marker to form the shape of the ring. It's okay if it looks to small, the ring will turn out totally adjustable.


2. Put the bead on the open end of the pin. Using your pliers, wrap the end of the pin around the bead, securing it.


That's it. Wear it with pride and make them in ten jillion different colors.

And know that I love you.

Saturday, September 15, 2012

apple pancakes.

I went to an apple orchard yesterday. I spent thirty dollars on apples yesterday. Worth it? Yes. Happy autumn, Danie.

These pancakes are the easiest and adaptable to whatever diet you feel like following that particular day. Get up and make yourself some healthy pancakes. You'll feel like a rockstar.

Easy Peasy Apple Pancakes for One

1/3 cup flour (wheat, all-pupose, any kind)
1 Tbsp rolled oats
1/3 cup milk (non-dairy or dairy)
1 Tbsp sugar. or honey. or maple syrup. agave nectar.
1/2 tsp baking powder
pinch salt
pinch of nutmeg
1/4 tsp cinnamon
optional: 1 tsp oil
1 small apple, sliced

Mix it up (minus the apple slices). Cook pancakes on a frying pan sprayed with non-stick cooking spray. Arrange apple slices on one side of the pancake before flipping to cook the other side. Enjoy with apple butter (I did) or whatever you want.

Permission to enjoy these pictures of me at an apple orchard with my main squeeze.


Wednesday, September 12, 2012

a diy handpiece and gas station love.

This week I've been without a coffee maker . Which means that on the days I'm not working at Starbucks, I'm forced to find alternative sources of caffeination. Because when one is without Mr. Coffee, drastic measures must be taken. 

Yesterday someone decided it was a good idea to lock their bike to a bike rack in a way that made it actually impossible to successfully unlock mine. I attempted to remove my bike from that situation for probably ten minutes. This is the point in the story where I'm supposed to tell you about the absolutely lovely human being that stopped to help. But no one did. Whatever, University of Minnesota students, whatever. 

Here's where we return to caffeination. When I got off the bus I had to take home because of the bike issue, I was feeling pretty sad. And without coffee. UNTIL, I went into the Holiday Gas Station (drastic measures), turned towards the extensive flavored coffee display and saw a sign that said "FREE COFFEE TUESDAY".

And that, my friends, is how I restored my faith in humanity.

Successful crafting also restores my faith in humanity and I've got a craft for you! I'm not sure what to call it...but the name I've given it makes sense in my head. Inspired by some things floating around the likes of Free People, I bring you a...

DIY Handpiece


You'll need a jump ring, sturdy string, a clasp, a small length of chain, and some sweet bead/button situation.

1. Measure the chain by putting the middle under your middle finger and bringing the two sides up to meet at the middle of the top of your hand. Where the two ends intersect at the middle is where you'll want to cut your chain. Attach a jump ring to link the two ends together and make everyone best friends.


2. Cut your string so that when inserted through the jump ring, it can be then wrapped around your wrist twice, leaving some room to start the wrapping at the middle of your hand. Then feed the middle of the string through the jump ring and tie a lark's head knot to secure. 


3. Choose some kind of bead or button situation. I chose a button because I have three bags of them. Thread both ends of the string through the button or bead. At this point, I also added a small bead on each of the two ends of the string and tied knots to secure them just above the button. You can't see that in this picture, but you'll see them at the end.


4. Attach your clasp by tying double knots on the ends of the strings onto the clasp ends. Trim the leftover string.


HOW TO WEAR: The chain goes over your middle finger, the bead sits in the middle of your hand, and the ends of the string wrap behind your wrist, infront, behind, infront, and behind again. At this point, clasp the ends together.


 You just made yourself a hand wrap bracelet thing. Look in the mirror and give yourself a thumbs up.


P.S. Check out my post on One Green Planet. I'm excited about it.

Thursday, September 6, 2012

striped friendship bracelet.

I hope you've had just the loveliest first full week of September! Mine has been filled with a lot of firsts. First night in a new house, first days in new classes, first time making a pumpkin spice latte at Starbucks, first time using a new oven, first time successfully getting through the intro to Eminem's hit song, "Lose Yourself". That's right, I can rap that. Only that.

It's still warm here in the MiniApple, so my brain is still in summer friendship bracelet mode. This one's pretty simple. Imma warn you, kids. Come autumn, it's all going to be about knitting, root vegetables, and cinnamon everything.


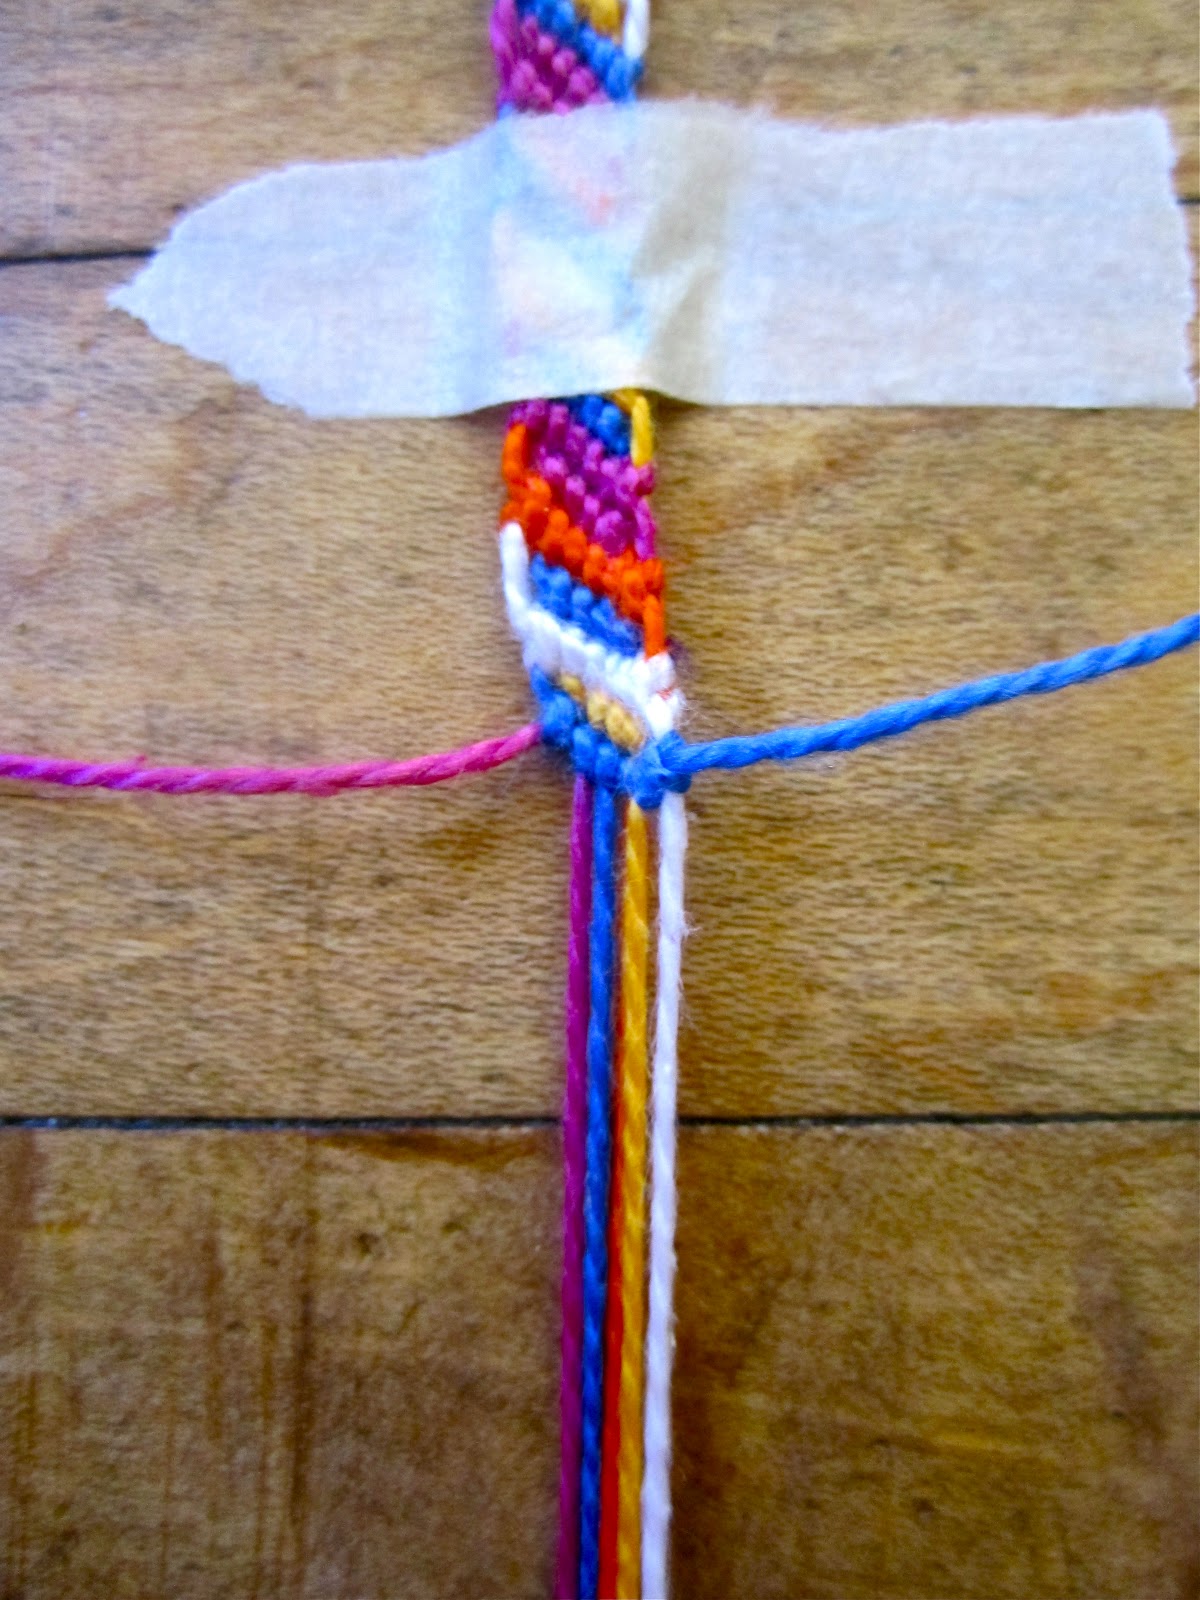
What you'll need: seven strings (you can use all different colors or double up on some) knotted together at the top.

1. Starting from the first string on the left, make forward knots on each of the six following strings. If you're not familiar with the basic friendship bracelet knot, Honestly WTF has a good tutorial.


2. Move the two outside strings aside.


Using the second string from the left, make four forward knots (you don't knot on the last string).


3. Repeat! So in my case, I would take the outside burgundy string I didn't use in the last row and knot on all the following strings, including the outermost blue string.

That's it!


[Gotta show a sweet pic of my first day of school]


Monday, September 3, 2012

no one belongs here more than you.


A new school year. I'm nervous because I don't know if I'm doing what I want to be doing. This is something that constantly worries me.

What I really want is to wake up, bake a batch of cookies, and then go to a place (a workplace) where I love to be. Where together, the people in that place and I create some sort of creative, inspiring, zero pressure, hardworking lovefest. I like the prospect of providing others with things that make them a little bit happier. Sometimes that's a piece of pumpkin bread, coffee, a laugh, or just a nice little conversation and a compliment on their hair.

That's the goal.

But I called my sister last night and she informed me that her neighbors were blasting the Brooks and Dunn hit, "Bootscootin' Boogie". Aside from that, she reminded me to breathe. Breathe instead of worry about where I'll be and how I'll feel tomorrow. Just to focus on today. And enjoy the opportunities you have at that moment. And if that means working my tush off in my Shakespeare class this semester, that's okay. More than okay.

I'll make an enjoyable life for myself because I know that's what I want. For right now, I can't worry about if it will happen or not.

It will...I'm working on this.

Those are my words of wisdom today. If a new school year is in store for you, best of luck. You got this.


Sunday, September 2, 2012

pb&j banana bread and the state fair.


I went to the Great Minnesota Get -Together (pstt, it's the State Fair). There were many, many lights, a "Dogs of the Wild West" show which featured a group of shuddering chihuahuas corralled on a platform, preteens really excited to see Demi Lovato, and of course all the fried food ever. I did not partake in any of the fried food. 

Do not judge me, I would have done it. If someone came up to me and said, "Danie, I purchased this large, deep fried pickle and am now gifting it to you." I would have eaten it. But no one did that. I ate a hot pretzel.

Anyway, this is the last thing I'll bake in this house. Are you looking forward to my baking endeavors in the new kitchen? Me too.


Hey, vegan peanut butter and jelly AND banana bread. 

You sure are tasty.

You sure don't contain any refined sugars.

You sure did aid in me using up a large amount of leftover blueberry jam.


I sure did eat you.

Vegan Peanut Butter and Jelly Banana Bread

Makes one 9x5in loaf.
  • 1 cup whole wheat flour
  • 1 cup all-purpose flour
  • 1/2 tsp ground cinnamon
  • 1/2 tsp salt
  • 1 Tbsp baking powder
  • 1 cup non-dairy milk
  • 1/4 cup liquid sweetener (honey, maple syrup, agave nectar) or brown sugar
  • 1/2 tsp vanilla extract
  • 2 Tbsp flax seed mixed with 4 Tbsp warm water
  • 1/2 cup peanut butter
  • 1/2 cup plain soy or regular yogurt
  • 1/3 cup unsweetened applesauce
  • 1 medium banana, mashed
  • 2 Tbsp canola oil
  • 1/3 cup jam
Preheat your oven to 350 degrees and grease a loaf pan.

In a large bowl, whisk together dry ingredients (flours-baking powder). In a medium sized bowl combine wet ingredients (milk-oil). Pour wet ingredients into dry and stir to combine.

Pour half of the batter into the prepared loaf pan. Spread jam on top of batter layer. Pour remaining batter over jam.

Bake for 50 minutes or until a toothpick, inserted into the middle of the loaf, comes out clean. Cool for 10 minutes before removing from the pan.